Buttons are the most popular type of garment fastener, with endless shapes and sizes and made from so many materials, they are a fun item to work with. They can make a huge impact to the look of a garment. There are three main types of buttons - shank, flat or sew through, and snaps.
Apart from snaps, I rarely buy buttons new. Thrift shops often sell small jars or bags for next to nothing. Another great source of buttons is the Etsy shop Skull Buttonry -all the proceeds from the shop go to Foundation 18's orphanage, education programs and humanitarian work in Indonesia. I bought these gorgeous wood buttons from there.
When sewing on buttons, you can use your machine. Most machines can stitch them on quickly. Personally, I prefer to do it by hand. I find it to be a nice and relaxing way to finish a project (I always sew the buttons on last) and I find I can control the position of the button easier when sewing by hand.
My top tip for hand sewing a button onto a garment is to double your thread. The double thread will add strength and it will take half the time of using a single strand ;) I'm always up for a shortcut!
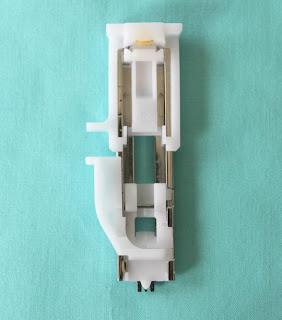
When creating button holes on your machine, you need the long button hole foot. It will look similar to this:
There will be particular settings you will need to change on your machine to stitch your button holes. Stitch length and stitch selection will both have to be changed - mine are marked on my machine with a small button hole symbol.
I could show you how I set my machine up to sew a button hole, but there isn't much point because everyone's machines will do it slightly differently. So instead, I will give you my top tips.
1. Refer your sewing machine manual. There will be a page outlining all the steps, required settings, with diagrams and instructions.
2. Search for a videos of your machine's make and model on You Tube. Many sewing machine companies upload instructional videos of their machines. Here is a good one that I found.
3. Practice, practice, practice! I still do a practice button hole on scrap fabric on every project where I need to sew button holes.
4. Mark your button hole position with tailors chalk or a disappearing ink pen. The button hole foot will make it awkward to ensure that the fabric is in the correct position, so it is best to mark it.
5. Don't be scared or intimidated! You will have the occasional stuff up - we all do. Once you sew a couple of button holes, you'll be a pro!
For more tips, tricks and help for sewing beginners, check out my Back to Basics series!


I know my machine will do it, but I have never sewn a button on with a sewing machine.
ReplyDeleteI too need to gain some confidence before trying to sew a button hole. Hopefully this tutorial will move me closer to it. Lovely blog by the way!
ReplyDeleteI really need to learn how to use my machine to do button holes. I have a garment ready and waiting, but am too nervous to give it a go as I have lost my machine manual :(
ReplyDeleteI also buy my buttons from skull buttonry. I found they had great prices and lovely designs, plus they're Australian!
I had mixed results sewing buttonholes for the first time this past weekend. My machine does a one step buttonhole, and I followed the manual's steps. After the first one it's meant to remember the settings you used. However I found the buttonholes got shorter each time. Have any other sewists experienced that? Any suggestions for how to remedy it (other than do it from scratch each time - which I ended up doing!)?
ReplyDeleteThanks for these tips, they make me feel like it will all come together one day :-)
Thank you for the button source! I posted her etsy shop on my facebook, convo'ed her that I will be using her supplies from now on, and thought of lots of great artsy ideas! I bravely tried my sewing machine for a button quilt. Works great, but I still like to sew them by hand, it doesn't take very long. Most buttons have the same size hole space, except vintage, which isn't standardized. Happy Sewing!
ReplyDelete