The difference this time is that I reduced the pattern to 75%, as I liked the shape but wanted something a bit smaller to take my lunch to work.
Showing posts with label bag. Show all posts
Wednesday, July 16, 2014
Small Big Tote Bag
This is the second Big Tote Bag I've made and I LOVE LOVE LOVE it.
The difference this time is that I reduced the pattern to 75%, as I liked the shape but wanted something a bit smaller to take my lunch to work.
Thursday, May 8, 2014
Ballet Messenger Bag
Anna started ballet lessons last Saturday. She is absolutely thrilled with the whole situation but we realised after we went shopping to buy her dance gear that she needed a bag to take to ballet classes.
I love it when you get an idea and then all the fabric you need is happily awaiting you in your stash! This messenger bag is made using the awesome Zaaberry Kids Messenger Bag tutorial.
I made one last year but wasn't all that happy with the finish - the tutorial suggests using medium interfacing but I only had heavy interfacing so I used that, and it was way too stiff - it was really awkward to work with. Lesson learned, this time I didn't have any interfacing so I used some quilt batting scraps which worked perfectly.
I used denim and a piece of cherry blossom fabric that I had in my stash. Initially I thought I'd use a pink for the feature fabric but I decided to steer clear of the ballet cliche colour and go for something a bit different but still feminine and pretty.
I guess Anna feels the same way about ballet - her outfit is all pink but she had her choice of pink, gold, silver or white ballet slippers...and she chose zebra print! Ha!
The interior of the bag is lined with a pink and aqua polka dot cotton. All the top stitching is in hot pink.
It was a nice quick sew - I had lots of interruptions and ate lunch between the start and finish of the project, and it still only took about two hours. Without interruption (or lunch!) you could probably get one made in 45 minutes, easy.
Anna loved it so much that she crash tackled me with cuddles and kisses when she got home from school! Aww cute girl - I will enjoy those kinds of reactions now because I don't think it will be quite the same when she is a teenager...
I love it when you get an idea and then all the fabric you need is happily awaiting you in your stash! This messenger bag is made using the awesome Zaaberry Kids Messenger Bag tutorial.
I made one last year but wasn't all that happy with the finish - the tutorial suggests using medium interfacing but I only had heavy interfacing so I used that, and it was way too stiff - it was really awkward to work with. Lesson learned, this time I didn't have any interfacing so I used some quilt batting scraps which worked perfectly.
I used denim and a piece of cherry blossom fabric that I had in my stash. Initially I thought I'd use a pink for the feature fabric but I decided to steer clear of the ballet cliche colour and go for something a bit different but still feminine and pretty.
I guess Anna feels the same way about ballet - her outfit is all pink but she had her choice of pink, gold, silver or white ballet slippers...and she chose zebra print! Ha!
The interior of the bag is lined with a pink and aqua polka dot cotton. All the top stitching is in hot pink.
It was a nice quick sew - I had lots of interruptions and ate lunch between the start and finish of the project, and it still only took about two hours. Without interruption (or lunch!) you could probably get one made in 45 minutes, easy.
Anna loved it so much that she crash tackled me with cuddles and kisses when she got home from school! Aww cute girl - I will enjoy those kinds of reactions now because I don't think it will be quite the same when she is a teenager...
Wednesday, October 30, 2013
Denim Sidekick Tote
I decided that I wanted a new bag for our Vietnam holiday, and I had a list of features that I wanted incorporated into the design. Originally I thought I'd probably just have to sew something up myself, but luckily the Noodlehead Sidekick Tote pattern had all the features I was after.
My requirements were:
For my bag, I wanted it to be fairly sturdy so I used denim for the exterior. Only problem was that I couldn't find a denim that was the right shade. Emma from For My Little Monster shared a trick with me back when we had the Winter Sewing Day - denim may be ugly on the front, but make sure you check out the wrong side of the denim too as that might be the shade you are after! Success! The denim I used is actually a really dark blue on the right side, but I used the wrong side which is a lovely mottled look and not too dark. Perfect.
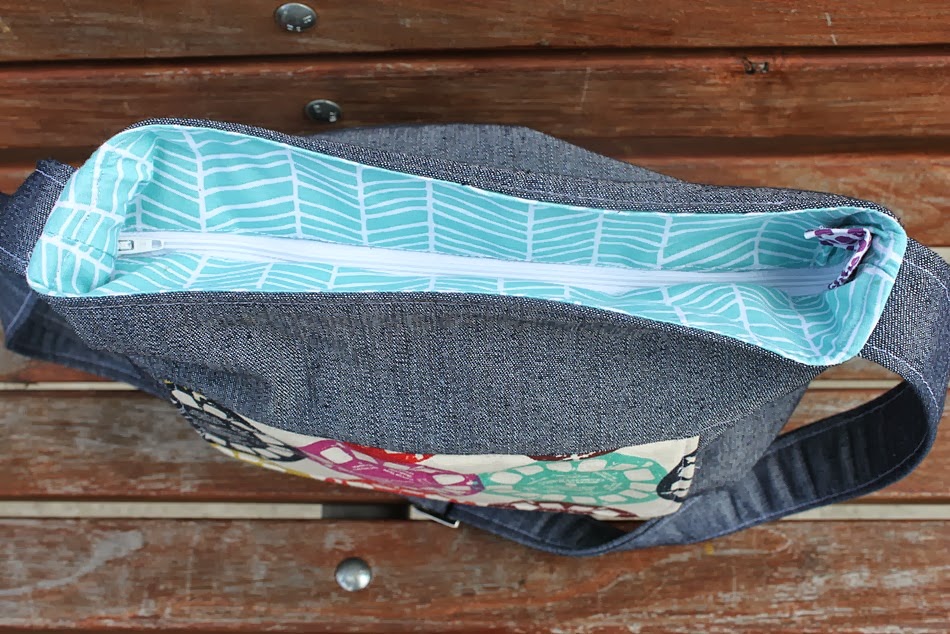
The recessed zipper was a success and I used the same purple polka dot on the zipper tab as I used on the interior of the front pocket. I could have used the aqua herringbone but I thought it was fun to have a little polka dot tab.
The interior fabric is Herringbone in Pond from Modern Meadow by Joel Dewberry. I really love it, I need to buy some more! The aqua colour coordinates nicely with the front pocket fabric.
For the front pocket I used some Melody Miller Viewfinder fabric which I've been hoarding for ages, waiting for the right project. One thing I've learned about my fabric stash is that the right project DOES eventually come along, so if you love it, buy it! Even if it's just a fat quarter.
The only thing I regret is that I didn't pay too much attention when I cut the pocket so the viewfinders aren't centred. Never mind, they still look good and the randomness of the fabric placement is fine.
I found this really pretty bag hardware at my local quilting store. They were a couple of dollars more expensive than some of the other hardware pieces but I think they add a professional look to the bag and I'm really pleased I chose them.
Why did I need the cross body strap? Because I will be zooming around on motorbikes in Ho Chi Minh City on a couple of tours. How awesome! I'm looking forward to reporting back and sharing some pics of our trip!
- Single adjustable strap for both over the shoulder and cross body wearing.
- Zipper closure for additional security
- Not too big - I just need to fit a wallet, water bottle, tube of sunscreen, keys, phone.
The interior fabric is Herringbone in Pond from Modern Meadow by Joel Dewberry. I really love it, I need to buy some more! The aqua colour coordinates nicely with the front pocket fabric.
The only thing I regret is that I didn't pay too much attention when I cut the pocket so the viewfinders aren't centred. Never mind, they still look good and the randomness of the fabric placement is fine.
Why did I need the cross body strap? Because I will be zooming around on motorbikes in Ho Chi Minh City on a couple of tours. How awesome! I'm looking forward to reporting back and sharing some pics of our trip!
Sunday, August 18, 2013
Paris Streets Duffle Bag
After finally outgrowing an old calico bag with a Wiggles motif that I upcycled from an old t-shirt, it was time for Anna to have a new bag. My bag making skills have certainly come a long way since the Wiggles calico bag (one of my first ever sewing projects), but still I felt that something fairly simple would fit the bill.
She already has a small suitcase for trips and her back pack for kindergarten, so this bag is just for times when she needs a change of clothes or her swimming gear. Or she wants to take her entire menagerie of soft toys to the supermarket. As you do when you are four.
How lovely is the fabric? It was kindly sent to me from my sponsor Fabric Fusion. The large print was perfect for project like a bag or cushions, but I'm currently waiting for Lucy to get over that "must draw on, spill food on or damage anything nice my parents own" phase and then we will get new sofas, then I will make the BEST CUSHIONS EVER. Man, I cannot wait until that day. So this time, a bag project was the winner.
The fabric is called La Vie D'Amour Paris Streets and you can grab some here. The bikes and the houses really evoke a Paris in Springtime feel (although, something about the tall skinny houses and the bikes also remind me of Amsterdam!) There is a gorgeous white coordinate which features major Paris attractions like the Eiffel Tower and the Arc D'Triomphe, and would be a perfect choice for Spring projects. You might also just love all things French themed, so francophiles, this fabric is for you!
The pattern for this bag is something I made up, but I wanted something user friendly for a small person, something easy to carry, and something fairly practical. I took a few pointers from this duffel bag tutorial by A Jennuine Life and the Lined Drawstring Bag tutorial by In Color Order.
A couple of things I did differently were to make the base out of oilcloth. Quilting cotton just isn't strong enough to take the wear and tear that the base of a bag will endure, so I though oilcloth would be a good option for it's durabililty and because it's water proof. I had a black and white polka dot oilcloth that looked good with the pink fabric. Denim or home dec weight fabrics would also be good choices.
Secondly, I made the bag so that the straps would create a drawstring style bag but would then be sewn into the base so it could be worn over the shoulder or as a backpack. To do this I left a small gap when sewing the base and the body of the bag together, and stitched the straps in at the very end. I used some green bias binding but it's not really strong enough so eventually I will make some sturdier straps and replace it.
In terms of measurements, I just used a dinner plate as a template for the round base, then measured the circumference to find the width I'd need for the fabric for the body of the bag. It's probably a bit too big for Anna now but she'll grow into it. The fabric is not babyish so she will get use out of it for several years to come without outgrowing it like she did with her Wiggles bag..
Anna is really pleased with her new bag and I am feeling rather smug that my idea to stitch the straps into the base ended up actually working!
Make sure you pop in and check out Fabric Fusion - they have a really lovely modern range and now that huge post costs have stopped many of us buying from the USA, it's great to have an Aussie retailer stocking lots of recently released designs. Or if you are lucky enough to live in Brisbane, you can go and visit Fabric Fusion in person!
How lovely is the fabric? It was kindly sent to me from my sponsor Fabric Fusion. The large print was perfect for project like a bag or cushions, but I'm currently waiting for Lucy to get over that "must draw on, spill food on or damage anything nice my parents own" phase and then we will get new sofas, then I will make the BEST CUSHIONS EVER. Man, I cannot wait until that day. So this time, a bag project was the winner.
The fabric is called La Vie D'Amour Paris Streets and you can grab some here. The bikes and the houses really evoke a Paris in Springtime feel (although, something about the tall skinny houses and the bikes also remind me of Amsterdam!) There is a gorgeous white coordinate which features major Paris attractions like the Eiffel Tower and the Arc D'Triomphe, and would be a perfect choice for Spring projects. You might also just love all things French themed, so francophiles, this fabric is for you!
The pattern for this bag is something I made up, but I wanted something user friendly for a small person, something easy to carry, and something fairly practical. I took a few pointers from this duffel bag tutorial by A Jennuine Life and the Lined Drawstring Bag tutorial by In Color Order.
A couple of things I did differently were to make the base out of oilcloth. Quilting cotton just isn't strong enough to take the wear and tear that the base of a bag will endure, so I though oilcloth would be a good option for it's durabililty and because it's water proof. I had a black and white polka dot oilcloth that looked good with the pink fabric. Denim or home dec weight fabrics would also be good choices.
Secondly, I made the bag so that the straps would create a drawstring style bag but would then be sewn into the base so it could be worn over the shoulder or as a backpack. To do this I left a small gap when sewing the base and the body of the bag together, and stitched the straps in at the very end. I used some green bias binding but it's not really strong enough so eventually I will make some sturdier straps and replace it.
In terms of measurements, I just used a dinner plate as a template for the round base, then measured the circumference to find the width I'd need for the fabric for the body of the bag. It's probably a bit too big for Anna now but she'll grow into it. The fabric is not babyish so she will get use out of it for several years to come without outgrowing it like she did with her Wiggles bag..
Anna is really pleased with her new bag and I am feeling rather smug that my idea to stitch the straps into the base ended up actually working!
Make sure you pop in and check out Fabric Fusion - they have a really lovely modern range and now that huge post costs have stopped many of us buying from the USA, it's great to have an Aussie retailer stocking lots of recently released designs. Or if you are lucky enough to live in Brisbane, you can go and visit Fabric Fusion in person!
Monday, November 26, 2012
Secret Santa Swap - What I Made
I haven't done any swaps in a while so when Kara from Me and Elna told me she was hosting a Secret Santa swap I thought it would be a great way to turn my thoughts to some Christmas sewing projects and try some new things.
I was partnered with the lovely Cat from Cat & Vee, and I just LOVE her designs and style.You can check out her blog here, and her gorgeous Etsy store here. You will find some awesome Christmas gift ideas there!
In the information she gave Kara, Cat said that hot pink and lime green were two of her favourite colours. Armed with that info and some fabric I had in my stash, I made her this drawstring bag. I love these because you can use them for unlimited purposes, and being a crafty lady I am sure she has a bunch of things to keep in it.
This bag was made using this great tutorial by Jeni from In Color Order. It was really easy and I'm sure I'll be making more of these!
Being a Secret Santa Swap, I made Cat some festive bunting to hang for Christmas. Rather than the traditional triangle shape, I made each piece of bunting into a flag shape. I also used satin ribbon rather than bias binding.
I will be posting a tutorial on how to make this shape of bunting in the next couple of weeks!
And finally, it wouldn't be Christmas without some lovely treats, so I included a bag of some delicious chocolates.
The secret is that this is the second bag of these chocolates that I bought - I ate the first before I sent the parcel. Shhh :)
So I hope Cat likes her gifts and has a very happy Christmas! I know it is only November, but it's really nice to be organised and have the first gifts of the season sorted and sent! I received my Secret Santa gift the other day - I love them and can't wait to show you!
Linking up with lots of other wonderful creative people here :)
I was partnered with the lovely Cat from Cat & Vee, and I just LOVE her designs and style.You can check out her blog here, and her gorgeous Etsy store here. You will find some awesome Christmas gift ideas there!
In the information she gave Kara, Cat said that hot pink and lime green were two of her favourite colours. Armed with that info and some fabric I had in my stash, I made her this drawstring bag. I love these because you can use them for unlimited purposes, and being a crafty lady I am sure she has a bunch of things to keep in it.
This bag was made using this great tutorial by Jeni from In Color Order. It was really easy and I'm sure I'll be making more of these!
Being a Secret Santa Swap, I made Cat some festive bunting to hang for Christmas. Rather than the traditional triangle shape, I made each piece of bunting into a flag shape. I also used satin ribbon rather than bias binding.
I will be posting a tutorial on how to make this shape of bunting in the next couple of weeks!
And finally, it wouldn't be Christmas without some lovely treats, so I included a bag of some delicious chocolates.
The secret is that this is the second bag of these chocolates that I bought - I ate the first before I sent the parcel. Shhh :)
So I hope Cat likes her gifts and has a very happy Christmas! I know it is only November, but it's really nice to be organised and have the first gifts of the season sorted and sent! I received my Secret Santa gift the other day - I love them and can't wait to show you!
Linking up with lots of other wonderful creative people here :)
Thursday, August 30, 2012
Tote Bag & Book Swap - gifts for Heather
Bonnie from Pink Stitches hosted a great swap last month that combined two of my great loves - sewing and reading! The brief was that we had to make a book bag for our partner, and also send a book that we thought they might enjoy.
Heather was my partner, she is an amazing sewer and quilter from Portland, Oregon (USA) and you can see her beautiful work over on her blog Quilt or Stitch.
Heather told me she liked blue and green colours, and things that are beach themed. It took me a while to decide on fabric and style, but in the end I settled on the Ranka Indigo fabric from the Lotta Jansdotter Echo range and some natural linen, which I think has a real beach feel to it.
The bag itself is just a very simple rectangular tote, which I made keeping books in mind - it is very similar in style to my own library bag, which you might remember from this post.
I wanted to keep it simple, but once I had sewn the exterior panels of the bag, I felt it needed something more than just decorative top stitching, so I watched a few you-tube videos and taught myself how to do chain stitch embroidery. Last year I adored this simple sun dress made by Katy from No Big Dill, where she chain stitched around the hem and added seed beads for a simple but beautiful detail, and that is where I got the idea from. For an embroidery novice I was pretty happy with how it came out. I stitched a seed bead on every third chain stitch.
I lined the bag with the coordinating Aneta Catalina Echo fabric.
Heather assured me that she had wide reading taste, but it's really hard to choose a book for someone else. You have to take the gamble that they may have read it already, so I avoided current well known best selling titles. I tried to think of a book that I had loved, and I read this one while relaxing by the pool on holiday in Bali a couple of years ago. One of those can't-put-it-down, relaxing, feel good reads - The Guernsey Literary and Potato Peel Society by Mary Ann Shaffer and Annie Barrows.
I added a couple of other small gifts as well - I made a small pouch from some left over Echo fabric, a pretty aqua coloured pen and a notebook.
Heather sent me a beautiful gift too - a gorgeous tote made from Echino fabric and a book that is absolutely my taste, Book of A Thousand Days by Shannon Hale. I can't wait to start reading it. You can see her gifts for me here. She also sent me a couple of mini totes for my girls and a Moda charm pack. So generous and I loved all of it, so thank you Heather!
Heather was my partner, she is an amazing sewer and quilter from Portland, Oregon (USA) and you can see her beautiful work over on her blog Quilt or Stitch.
Heather told me she liked blue and green colours, and things that are beach themed. It took me a while to decide on fabric and style, but in the end I settled on the Ranka Indigo fabric from the Lotta Jansdotter Echo range and some natural linen, which I think has a real beach feel to it.
The bag itself is just a very simple rectangular tote, which I made keeping books in mind - it is very similar in style to my own library bag, which you might remember from this post.
I wanted to keep it simple, but once I had sewn the exterior panels of the bag, I felt it needed something more than just decorative top stitching, so I watched a few you-tube videos and taught myself how to do chain stitch embroidery. Last year I adored this simple sun dress made by Katy from No Big Dill, where she chain stitched around the hem and added seed beads for a simple but beautiful detail, and that is where I got the idea from. For an embroidery novice I was pretty happy with how it came out. I stitched a seed bead on every third chain stitch.
I lined the bag with the coordinating Aneta Catalina Echo fabric.
Heather assured me that she had wide reading taste, but it's really hard to choose a book for someone else. You have to take the gamble that they may have read it already, so I avoided current well known best selling titles. I tried to think of a book that I had loved, and I read this one while relaxing by the pool on holiday in Bali a couple of years ago. One of those can't-put-it-down, relaxing, feel good reads - The Guernsey Literary and Potato Peel Society by Mary Ann Shaffer and Annie Barrows.
I added a couple of other small gifts as well - I made a small pouch from some left over Echo fabric, a pretty aqua coloured pen and a notebook.
Heather sent me a beautiful gift too - a gorgeous tote made from Echino fabric and a book that is absolutely my taste, Book of A Thousand Days by Shannon Hale. I can't wait to start reading it. You can see her gifts for me here. She also sent me a couple of mini totes for my girls and a Moda charm pack. So generous and I loved all of it, so thank you Heather!
Monday, April 30, 2012
Covert Robin Gifts for Jill
A couple of weeks ago I guest posted for Jill from Made with Moxie to share the Covert Robin gifts I made for her. In case you missed it, here they are!
This swap was a tricky one - I couldn't make a final decision on what to make for Jill and I kept stressing that it wouldn't be good enough! I am a bit too hard on myself! In the end I settled on three things:
First, I made a denim tote. I used some dark denim and top stitched it in hot pink and finished it with a heart shaped black button. Inside it is lined with a fun cherry print.
When I participate in swaps I like tostalk check out my recipient's blog and Pinterest boards to see what their style is. Jill's blog logo kept popping into my mind (see it HERE), so I used some black and white felt and made her a pin of her blog logo. I pinned it to her bag, so when she goes to the grocery store someone might say "what's that?" and she can say "the logo for my blog / etsy store"...cue conversation and potential customer!
And finally as someone else who loves fabric and sewing, I knew Jill would love a zip pouch made from selvedge. Its a project I started a while ago, and I put it aside for ages waiting for the right reason to finish it. The Covert Robin swap came along so I finished it with Jill in mind.
And the other side:
And what is an international gift without a selection of local delicacies?
Thanks to Australia Post's terrible slowness, I have not recieved my gift yet, but I know it will be worth the wait! To my Covert Robin if you are reading this, I am really excited to find out who you are and have you guest post about what you made!
I am linking this post to the Covert Robin link party - pay it a visit and see all the amazing handmade gifts the participants made each other!
This swap was a tricky one - I couldn't make a final decision on what to make for Jill and I kept stressing that it wouldn't be good enough! I am a bit too hard on myself! In the end I settled on three things:
First, I made a denim tote. I used some dark denim and top stitched it in hot pink and finished it with a heart shaped black button. Inside it is lined with a fun cherry print.
When I participate in swaps I like to
And finally as someone else who loves fabric and sewing, I knew Jill would love a zip pouch made from selvedge. Its a project I started a while ago, and I put it aside for ages waiting for the right reason to finish it. The Covert Robin swap came along so I finished it with Jill in mind.
And the other side:
And what is an international gift without a selection of local delicacies?
Thanks to Australia Post's terrible slowness, I have not recieved my gift yet, but I know it will be worth the wait! To my Covert Robin if you are reading this, I am really excited to find out who you are and have you guest post about what you made!
I am linking this post to the Covert Robin link party - pay it a visit and see all the amazing handmade gifts the participants made each other!
Monday, April 23, 2012
Harry Potter Library Bag - Tutorial
You may remember the Big Books Library Bag? I also designed a custom image and made a bag for my sister who is a big Harry Potter fan. Last week I made another one as a custom order and I thought you might like to see it!
If you haven't read the Harry Potter series (What? Have you been living under a rock?!) 'Expecto Patronum' refers to a powerful spell that Harry must perform under duress several times during the series to protect himself. The deer is the form Harry's magic takes during that spell. Each character in the book have a deeply personal connection to the form their 'patronum' takes.
I thought you might like a re-cap on how to make this very simple tote so here is a condensed version of the tutorial.
You need -
1/2 metre calico / other solid fabric for exterior
1/2 metre of lining fabric
t-shirt transfer paper (available at craft stores)
computer and printer
cotton ribbon / tape for shoulder straps
iron and ironing board
Basic sewing supplies including machine
Firstly, create the image you want on your bag. You can use a photo editor such as PicMonkey. Save this image into a word processing document and re-size it to how large you want it, then print onto the t-shirt transfer paper according to the instructions on the packaging. If you use text, make sure it prints out reversed so it is correct when ironed onto the fabric.
Cut both your exterior and lining fabric for the tote bag. Mine was 35 x 42cm (14" x 16")
Take one piece of the exterior fabric, and referring to the instructions on the transfer paper packaging, iron your image onto your fabric. (You may notice from the picture at the top that I also appliqued some stars onto my bag. For instructions on how to applique, have a look here.)
Take your exterior pieces and pin them with right sides together. Sew all the way around the sides and bottom of the bag.
With the lining, sew around the sides and bottom of the bag but leave a 10cm (4") gap in the middle of the bottom of the bag.
Turn the exterior bag fabric right sides out. Place it inside the lining which is still right sides together.
Pin the shoulder straps in place between the lining and the exterior. Sew all the way around the top of the bag.
Using the gap in the bottom of the lining, pull the bag through. Press and stitch the gap in the lining close to the edge. Tuck lining inside.
Press and top stitch around the top of the bag.
That's it! For a more detailed tutorial including how to design your image on a photo editing site, have a look here.
The best part about this bag is that it can be customised in so many ways! If you make one I'd love to see it, upload a photo to the Sew Delicious flickr pool!
If you haven't read the Harry Potter series (What? Have you been living under a rock?!) 'Expecto Patronum' refers to a powerful spell that Harry must perform under duress several times during the series to protect himself. The deer is the form Harry's magic takes during that spell. Each character in the book have a deeply personal connection to the form their 'patronum' takes.
I thought you might like a re-cap on how to make this very simple tote so here is a condensed version of the tutorial.
You need -
1/2 metre calico / other solid fabric for exterior
1/2 metre of lining fabric
t-shirt transfer paper (available at craft stores)
computer and printer
cotton ribbon / tape for shoulder straps
iron and ironing board
Basic sewing supplies including machine
Firstly, create the image you want on your bag. You can use a photo editor such as PicMonkey. Save this image into a word processing document and re-size it to how large you want it, then print onto the t-shirt transfer paper according to the instructions on the packaging. If you use text, make sure it prints out reversed so it is correct when ironed onto the fabric.
Cut both your exterior and lining fabric for the tote bag. Mine was 35 x 42cm (14" x 16")
Take one piece of the exterior fabric, and referring to the instructions on the transfer paper packaging, iron your image onto your fabric. (You may notice from the picture at the top that I also appliqued some stars onto my bag. For instructions on how to applique, have a look here.)
With the lining, sew around the sides and bottom of the bag but leave a 10cm (4") gap in the middle of the bottom of the bag.
Turn the exterior bag fabric right sides out. Place it inside the lining which is still right sides together.
Pin the shoulder straps in place between the lining and the exterior. Sew all the way around the top of the bag.
Using the gap in the bottom of the lining, pull the bag through. Press and stitch the gap in the lining close to the edge. Tuck lining inside.
That's it! For a more detailed tutorial including how to design your image on a photo editing site, have a look here.
The best part about this bag is that it can be customised in so many ways! If you make one I'd love to see it, upload a photo to the Sew Delicious flickr pool!
Tuesday, April 3, 2012
The Year So Far...
Can you believe it's April already? In a couple of days, I celebrate my birthday...they seem to come around quicker every year! Here in Melbourne the leaves are changing, the mornings are chilly and the AFL is back (to my husband's glee), which means we are heading quickly towards winter. I am definitely a warm weather person, so I am dreading it!
Today I thought I'd do a quick round up of my favourite posts from the first quarter of 2012.
My labels tutorial went to number one with a bullet on my stats list - it is now my most viewed post ever. I got a lot of great feedback from people who had successfully used the tutorial to make their own labels, which was so lovely!
My Big Books Library Bag tutorial went viral on Pinterest - it was amazing. I have since made several of these bags for friends and one as a custom order in my shop for a lovely lady named Kaitlin who saw it on my blog and had to have it! Hopefully it has arrived in Pennsylvania by now and she is giving all the people at her local library a good laugh!
I shared my husband's crafty secret - he crochets! You can read more about this divine baby blanket he made for his colleague Kellie here.
Finally, for my daughter's 3rd birthday I made a rainbow cake! She still talks about it all the time which is the ultimate compliment and made it completely worthwhile.
Don't forget to have a look at my Needle & Thread interviews with some amazingly talented ladies - you can't help but be inspired when you see their work.
My next post is a great tutorial, so stay tuned! I am planning a little fabric giveaway when I hit 250 'likers' on Facebook, so if you don't already, make sure you join me over there!
Today I thought I'd do a quick round up of my favourite posts from the first quarter of 2012.
My labels tutorial went to number one with a bullet on my stats list - it is now my most viewed post ever. I got a lot of great feedback from people who had successfully used the tutorial to make their own labels, which was so lovely!
My Big Books Library Bag tutorial went viral on Pinterest - it was amazing. I have since made several of these bags for friends and one as a custom order in my shop for a lovely lady named Kaitlin who saw it on my blog and had to have it! Hopefully it has arrived in Pennsylvania by now and she is giving all the people at her local library a good laugh!
I shared my husband's crafty secret - he crochets! You can read more about this divine baby blanket he made for his colleague Kellie here.
Finally, for my daughter's 3rd birthday I made a rainbow cake! She still talks about it all the time which is the ultimate compliment and made it completely worthwhile.
Don't forget to have a look at my Needle & Thread interviews with some amazingly talented ladies - you can't help but be inspired when you see their work.
My next post is a great tutorial, so stay tuned! I am planning a little fabric giveaway when I hit 250 'likers' on Facebook, so if you don't already, make sure you join me over there!
Monday, March 26, 2012
Deer iPad Cover
Yesterday was my sister Kirsten's 30th birthday - HAPPY BIRTHDAY KIRST!! Our family pooled our resources to buy her one of the new iPads that have just been released - cool gift right?
For a personal touch to the gift, I splashed out on some beautiful Echino patchwork fabric (same as this one) and made her a sleeve for her iPad. I used this great tutorial by One Shabby Chick, which I found on Pinterest.
I fussy cut the deer with some of the surrounding colours, then used some linen at either end. I used some more of the Echino fabric to make the velcro closure at the top.
Here is the back view:
That grey pearl bracelet print on the Echino fabric caught my eye, so I matched it with some Circle Stripes in Cloud from 'A Walk in the Woods' by Aneela Hoey, and used that to line the pouch.
The 'A Walk in the Woods' fabric collection is just beautiful and I can't wait to buy some more!
I am so pleased with how it came out, and especially pleased with my fabric choices, I think they made it quite special and unique.
It was a great weekend with family and friends to celebrate and I will have another upcoming posts to share some more of Kirsten's 30th birthday!
For a personal touch to the gift, I splashed out on some beautiful Echino patchwork fabric (same as this one) and made her a sleeve for her iPad. I used this great tutorial by One Shabby Chick, which I found on Pinterest.
I fussy cut the deer with some of the surrounding colours, then used some linen at either end. I used some more of the Echino fabric to make the velcro closure at the top.
Here is the back view:
That grey pearl bracelet print on the Echino fabric caught my eye, so I matched it with some Circle Stripes in Cloud from 'A Walk in the Woods' by Aneela Hoey, and used that to line the pouch.
The 'A Walk in the Woods' fabric collection is just beautiful and I can't wait to buy some more!
I am so pleased with how it came out, and especially pleased with my fabric choices, I think they made it quite special and unique.
It was a great weekend with family and friends to celebrate and I will have another upcoming posts to share some more of Kirsten's 30th birthday!
Wednesday, March 21, 2012
Scrap Bag Swap - My gifts from Anissa
Last post I shared what I made for Kerrie - today I am sharing what I was sent from Anissa from Grow Mama.
How lovely is it to receive a parcel in the mail? Especially when it is an international parcel!
All the way across the ditch from New Zealand came my scrap bag swap gift which was vintage themed. I received a lovely selection of vintage fabrics.
Some florals -
Some children's prints -
And as an extra surprise, these sweet little pictures were sandwiched in the layers of fabric. How gorgeous!
And finally some vintage buttons in greens and blues -
All of these lovely bits and pieces came in satchel style bag. My photos of the bag didn't do it justice, but you can see the vintage detail in this picture below. Anissa made it from a rose floral and the bottom of the bag has a lace trim.
Such a lovely gift - thanks so much Anissa! I highly recommend participating in swaps - it's a great way to connect with other crafters and the best part is receiving a surprise in the mail!
How lovely is it to receive a parcel in the mail? Especially when it is an international parcel!
All the way across the ditch from New Zealand came my scrap bag swap gift which was vintage themed. I received a lovely selection of vintage fabrics.
Some florals -
Some children's prints -
And as an extra surprise, these sweet little pictures were sandwiched in the layers of fabric. How gorgeous!
And finally some vintage buttons in greens and blues -
All of these lovely bits and pieces came in satchel style bag. My photos of the bag didn't do it justice, but you can see the vintage detail in this picture below. Anissa made it from a rose floral and the bottom of the bag has a lace trim.
Such a lovely gift - thanks so much Anissa! I highly recommend participating in swaps - it's a great way to connect with other crafters and the best part is receiving a surprise in the mail!
Subscribe to:
Posts (Atom)