Showing posts with label pattern review. Show all posts

Friday, February 27, 2015

Spike The Echidna Cushion

I know this pattern is called Hazel the Hedgehog...but being Australian my kids are not too familiar with hedgehogs. As soon as the block was finished they named her 'Spike the Echidna' and it stuck!


When Angie from Gnome Angel announced that she was hosting a Hazel Quilt-A-Long using Elizabeth Hartman's pattern during February I decided to join in. This year I am making a point of trying new things and participating in more sewing events. It's a good way to push myself and try new things, and also join in and connect with the online sewing community.


I started off with just one block and it took some time. I love this orange leaf print and knew it would be perfect for Spike's spines. The leaves give it some additional pointiness (is that even a word?) and then I went for solids for the body and a low volume grey spot for the background. Despite the accuracy of the block, it's not paper pieced. (making it more appealing for me!)


I knew that making a series of these blocks for a quilt would be too much right now, so I decided upon a cushion. First I added more of the background fabric to make the block large 16" x 16".  I basted it and I used my hera marker (a little device that draws a crease into projects rather than a pencil or pen mark) to draw up a simple criss cross (Kriss Kross - jump jump!)* design for the quilting and I quilted in a pale grey thread.


Finally I bound the cushion (my first time binding a cushion!) with the same fabric as the spines. It finished it really nicely as I didn't want to add any other colour.


The back keeps the colour scheme but I used a grey with larger white polka dots that I had floating around in my stash. To conceal the zipper I used this tutorial by Ms Midge.

Spike was very quickly claimed by Anna and now has a happy life living as a feature cushion on her bed next to her pet pillows!

Make sure you pop over and check out all the other variations of Hazel from the QAL over at Gnome Angel's link party!

*yep I was a teenager in the 90s and now that song is stuck in my head.

Wednesday, September 10, 2014

Sewing Kit For Beginners : Review

Back in the days when I was just first getting interested in sewing, I wish I had've found this kit.

Before I had a fabric stash, before I had a selection of thread, before I was able to just guess what size zipper I needed...and I still freak out in the interfacing section at Spotlight.

Sarah from Hunting for Ladybugs is one of my lovely sponsors (check out her cool gif in the sidebar) and she asked if I'd like to review one of her sewing kits. She sent me the kit as if I was a regular paying customer so I could get the full experience.


Monday, September 8, 2014

Review Your Sewing Machine

This week I'm going to be sharing a few reviews of some sewing related kits and items that businesses have sent to me to try out. I'd love to add another dimension to this week of reviews - I want you to have YOUR SAY! The majority of us have and regularly use a sewing machine, and I want you to tell me what you think of yours.

I often have people contact me and ask what machine they should buy. Very tricky question for me because I have limited experience with machines other than my own basic Janome.


So I figure, who better to ask than my community? I'm sure you will have some interesting things to say about various machines, brands, and how you use them. There will be no bias and no sales pitches - this will be machine reviews by seamstresses and quilters who have genuine opinions. I think it will be really helpful.

Thursday, July 31, 2014

Bubble Pocket Shorts : Shorts on the Line

The Shorts on the Line series is back! Seriously is it that time of year already?


Friday, February 14, 2014

Quilted Big Tote Bag

It's Valentine's Day today  - hurrah if you are into it, but personally I always remember my awkward teenage self who never received anything for V Day while girls around me at school were showered with flowers and cards. It can be a wonderful day, but man - it can be a terribly lonely one too! (Note to self: do something sweet for my girls on future Valentine's Days when they are teens.)

A few weeks back I signed up for the Secret Valentine's Exchange hosted by Sanae and Ute. I got my details and discovered I would be making something for Stephanie from Sew A Crooked Line.


As I always do when sewing for others, particularly for people I don't know, I went through a crisis of confidence, then took weeks to settle upon a project to make for Stephanie. If you are regular reader of my blog, you'll know my love for zipper pouches knows no bounds, but this time I wanted to make something I hadn't made before.

Stephanie said in her info that she liked the colours pink and mint. Pink I can do, but mint was a bit tricker, so with that colour palette in mind I made the patchwork panels for the bag with lots of pinks and a variety of greens moving into aquas. I also used any fabric I had that had a love theme.


For this side of the tote I decided to make this elephant print the feature - so glad I did as it turns out Stephanie is a huge fan of elephants and sponsors three of them.


I really love those TVs.

The pattern for this bag is the awesome Big Tote Bag designed by Abby from Things for Boys. We are friends in real life so I thought, perfect, I can give her a buzz if I need help. Didn't need to - this bag is so simple. Cut 2 exterior pieces, cut two lining pieces, follow some simple construction steps, wham bam DONE. Obviously the quilting made my construction process a bit different - I made two patchwork panels, basted and free motion quilted them, then cut them out. From there the bag construction was the same as the pattern. I used some simple hot pink cotton drill for the lining.


Then once I had finished the bag, I stressed out again. This bag is kinda LOUD. Bold prints, bright colours. What if Stephanie has a more understated style? But then I thought, it's not an everyday bag. It's large, so it's more of a beach bag or library bag. Maybe a gym bag. Or even a bag to keep her latest unfinished sewing project in, so all the pieces are together.

The size of this bag is really great so in my head I am already planning another one, this time for me to take to work so I can fit my lunch, drink bottle, book and handbag. Better add it to the ever growing to-do list...

Sending you all lots of love on this Valentine's Day!

Tuesday, January 7, 2014

Japanese Lawn Bess Top

Today I'm taking part in the Imagine Gnats January Pattern Tour. I've sewn up another version of the Bess top, I was keen to add another garment to my summer wardrobe.


A while ago I found this blue floral japanese lawn fabric at Spotlight, and I grabbed a couple of metres. I had no real plans for it, but sometimes when you find something random at Spotlight that you like, if you don't buy it, you'll never see it again. It is beautifully soft and feels lovely against my skin but I had a really hard time sewing with it!

My first Bess top was made with a cotton voile, and I thought a lawn would be fairly similar. Wrong. The voile had a lovely drape that worked much better with this pattern. I made a size 10 first time around and felt the it was a little bit big, so I sized down to an 8. Off the rack I am usually an Australian size 10-12, which is a US size 6-8.


Ignore the crazy hair in this pic (haha you looked again didn't you?)

You know those projects where nothing goes right? I mucked up one of the sleeves a little bit so I had to unpick both the seam and the top stitching, then try again, then I pierced a hole in the fabric, I had tension trouble, then my thread started nesting, arrrrgggghhh.

But it worked out in the end and I'm pretty happy with it. It will be a nice light top to wear with jeans during the warmer weather. I could have finished it better on the interior, but by the end I just wanted it DONE after all the hiccups and seam ripping. Maybe when I'm in the mood I'll go back and tidy it up.


The pattern suggests using strips of jersey as the facing for the neckline, sleeves and hem. I didn't particularly like the finish it gave my first version - it seemed a bit scrappy, especially after a few washes. I used bias binding this time and I prefer it.

It doesn't show in the pictures due to the floral pattern, but the pleat in the shoulders are much more obvious with this fabric than the voile, which I like because it adds a nice feature and makes the top more interesting.

Pattern details: two pieces, with sleeves created from back piece. I used 1.5m of fabric and had a fair bit left over. Trickest bit is creating the sleeves. Quick sew, it can easily be whipped up in a couple of hours. Get the Bess Top pattern here.

Rachael is having 20% off all her patterns during the January pattern tour with the code JANUARYTOUR, so definitely pop over and check them out.


All these amazing bloggers are joining in the tour so you can see lots of different versions of the Imagine Gnats patterns here during January:

Inder Loves Folk Art / mon petit lyons / Sew Delicious
la inglesita / Miss Matatabi / Rae Gun Ramblings
Welcome to the Mouse House / Casa Crafty
Make it Handmade / Made with Moxie / Buzzmills
girl like the sea / just me jay / Play Crafts
Sew Well Maide / Sew Charleston / Mingo and Grace
Caila Made / Sewbon / do Guincho / call ajaire
Alison Glass / a.Amelia Handmade / Bored & Crafty
you & mie / Stitched Together / things for boys
fake it while you make it / Sanae Ishida
Behind the Hedgerow / I Seam Stressed / Charming Doodle
The Crafty Kitty / Siestas & Sewing / Figgy's


Sunday, December 8, 2013

Woodland Summer Dress

Lucy has really shot up over the last few months and hardly any of her summer clothes fit. She is more than two years younger than Anna but is only about an inch shorter! The first thing that was on my to do list after we got back from our Vietnam trip was to sew up some new summer dresses for her.


I've used this pattern a few times before - I bought it last Christmas when I made this dress for Anna. It's the Tie Dye Diva Fair & Square pattern. It's a lovely and simple style that works well for summer. I love using solids for the bodice and hem band to contrast against a feature print fabric for the main dress. I sewed up a size three due to Lucy's height but it's way too big for her in the bodice. Never mind - that means she will get a couple of years wear from it.


Lucy calls this her "fox dress" because of the foxes featured in the fabric, which is Jewel from the Norwegian Woods range by Michael Miller. I got it from my lovely sponsor Fabric Fusion. The colours are a lovely change from the usual pinks and blues I tend to go for, and it would be equally gorgeous for a girl or boy. If you need unisex colours for a gender neutral baby gift, this range is a great choice.


For the back I used one large button as a closure, and chose a yellow one to pick up some of the yellow tones in the fabric. It's hard to see in the pictures but all the top stitching is done in bright orange, which looks great against the green and complements the foxes and other orange features in the print. The dark green / aqua solid is some left over homespun I used on a recent quilting project. It matches nicely with the tree trunks and flowers in the woodland fabric.


Even though this dress isn't Christmas specific, it does have a festive feel to it and Lucy actually wore it today to an early Christmas celebration we had with my side of the family, so I'm going to add it to the 12 Days of Christmas Flickr group, which features all the gorgeous creations from the series of the same name which is being hosted by Sewpony and Craftstorming. It's been a great series so far with lots of handmade festive kiddo outfits.

I made another one at the same time as I sewed this one, but in completely different fabrics so it has a really different look - I love how that happens! I'll share that one soon.

Monday, November 25, 2013

Owl Baby Softies

I was reading this post over at Threading My Way a couple of days ago and I just LOVED the cute monster softie Pam made for the Softies for Mirabel toy drive. I have been meaning to make a softie for this cause for the last couple of years but as usual things got in the way and it never happened.

Not this year - these little cuties are all packed up and ready to be posted!


A few months back I attacked my scraps and made a bunch of these little owls using this Dolls & Daydreams pattern. My friend Jane from Lil Pip Designs makes really cute ones from the same pattern and she inspired me to give them a try. They are a great size for babies and toddlers and the ribbon wings makes them a cross between a softie and a ribbon taggie toy.


This owl is a favourite of mine for two reasons - it could be given to either a boy or girl and I adore the pezzy print fabric that I've used for the body. It's a coincidence that Pam's monster is made from the same fabric but in yellow!

You can find all the details about Softies for Mirabel here, and make sure you stop by and check out Pam's monster!

Wednesday, October 30, 2013

Denim Sidekick Tote

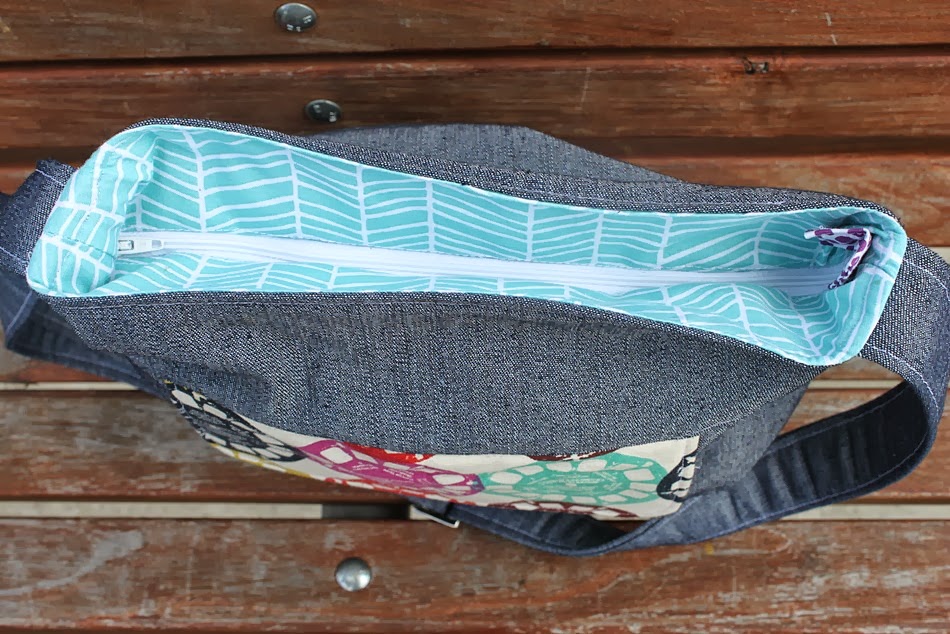
I decided that I wanted a new bag for our Vietnam holiday, and I had a list of features that I wanted incorporated into the design. Originally I thought I'd probably just have to sew something up myself, but luckily the Noodlehead Sidekick Tote pattern had all the features I was after.


 My requirements were:
  • Single adjustable strap for both over the shoulder and cross body wearing.
  • Zipper closure for additional security
  • Not too big - I just need to fit a wallet, water bottle, tube of sunscreen, keys, phone.
This pattern had all that, so I was relieved as I'm certain I couldn't have done as good a job trying to come up with a design myself. I certainly would have struggled with inserting the zipper into the lining.


For my bag, I wanted it to be fairly sturdy so I used denim for the exterior. Only problem was that I couldn't find a denim that was the right shade. Emma from For My Little Monster shared a trick with me back when we had the Winter Sewing Day - denim may be ugly on the front, but make sure you check out the wrong side of the denim too as that might be the shade you are after! Success! The denim I used is actually a really dark blue on the right side, but I used the wrong side which is a lovely mottled look and not too dark. Perfect.


 The recessed zipper was a success and I used the same purple polka dot on the zipper tab as I used on the interior of the front pocket. I could have used the aqua herringbone but I thought it was fun to have a little polka dot tab.


The interior fabric is Herringbone in Pond from Modern Meadow by Joel Dewberry. I really love it, I need to buy some more! The aqua colour coordinates nicely with the front pocket fabric.


 For the front pocket I used some Melody Miller Viewfinder fabric which I've been hoarding for ages, waiting for the right project. One thing I've learned about my fabric stash is that the right project DOES eventually come along, so if you love it, buy it! Even if it's just a fat quarter.

The only thing I regret is that I didn't pay too much attention when I cut the pocket so the viewfinders aren't centred. Never mind, they still look good and the randomness of the fabric placement is fine.


I found this really pretty bag hardware at my local quilting store. They were a couple of dollars more expensive than some of the other hardware pieces but I think they add a professional look to the bag and I'm really pleased I chose them.


Why did I need the cross body strap? Because I will be zooming around on motorbikes in Ho Chi Minh City on a couple of tours. How awesome! I'm looking forward to reporting back and sharing some pics of our trip!

Tuesday, September 24, 2013

Voile Bess Top

Let's get this Selfish Sewing Week party started! First up is my Bess top.


I was lucky enough to be a pattern tester for this top which is the latest pattern designed by Rachael, who is coincidentally one of the hosts of Selfish Sewing Week.


I like wearing woven fabrics for summer - they have a nice light touch against the skin and they breathe well in hot weather. I used a lovely soft cotton voile that I bought at my local fabric store.

This modelling thing takes serious concentration.

This pattern has a pretty cool feature - all though there are sleeves, there are only two pattern pieces! Yep - two! I have no idea how Rachael came up with this genius design, but the sleeves are part of the back pattern piece and fold over the shoulder to create the sleeves. There is also a cute pleat detail on the shoulder, which is hard to see due to the print of the fabric, but is a nice feature to notice close up.


I topstitched with yellow and I love it - I tend to use white thread for so many projects, it's always great to sew with colour.


You can find the Bess pattern here. Huge thanks to Abby for snapping these pics for me! We had a lovely afternoon eating doughnuts, talking fabric and cuddling her cute baby boy.

Friday, September 6, 2013

Some Blank Tanks

Summer is in the air here, we've finally had our first sunny week and wow, how it has lifted my mood! So great to get outside and enjoy it.


In preparation for the Australian summer, I've been sewing a few things and these tank tops were first on my list. I bought the Blank Tank pattern* a few months back after I'd read Toni-Maree's post Make the Basics. Her post really resonated with me because I've always been pretty lazy and bought basics from chain stores. I still will, but on a smaller scale. Before I buy, I will ask myself "can I make this?"


Lucy's tank is made from a light weight cotton jersey knit that I bought ages ago in the remnant bin at a local fabric store. The pocket is a blue cotton jersey offcut from my scrap bin. I used a zig zag stitch to finish the neckline and I wasn't too happy with it. It looks ok but I think I need to invest in a double needle now that I'm sewing with knits on a more regular basis.


Anna's tank has two contrasting sides - the front is a magenta love heart print cut from an adult tee I picked up for 50c at the thrift shop. The back is plain black jersey and is left over from the My Little Pony tumble tee I made her a few weeks ago.


My normal thought process would be "oh well, it's just quicker and easier to buy them from the store." There is some truth to that, however I think it's a matter of being prepared and having good patterns at your disposal. The Blank Tank* took about 3 minutes to cut, and about 15 minutes to sew.  The shoulders and side seams were a breeze and I used my overlocker, the time consuming part is finishing the neck and arm holes and hemming.

If I think about the time it takes to travel to the store, buy items, then travel home, I actually made these quicker. These tanks probably cost me around $1.50 each. Making the basics pays off.


Aww these girls! So cute together, I hope they are always best friends.

I really like Blank Slate Patterns*, there is great stuff for boys and girls and they have good discount codes if you buy three or more patterns at once. Their basic shapes lend them to some real creativity if you want to mix them up and add your own unique details.

Make The Basics

*affiliate links

Thursday, August 15, 2013

Debbie's Birthday Dress Blog Tour

I have been so lucky lately to have been asked by a few very talented pattern designers to be part of their blog tours! Today is no exception - I've had the pleasure of sewing up Debbie's Birthday Dress by Sewpony Vintage.


I love the swingy shape of this dress - it has a really 60s feel and is very reminiscent of a few vintage pinafore patterns I've picked up at op shops over the last couple of years.

I chose view 1 which has separate bodice and skirt at the front and a single back piece with a button closure. The main reason I chose this view was that I had some gorgeous vintage trims I wanted to use. I don't use trims often so because I sew a lot with prints so it was great to have a reason to get them out and choose one. I settled on a red trim, but it didn't seem to be enough on it's own so I also included a couple of red buttons.


I trialled a couple of other fabrics for the dress itself, and anything with a print just camouflaged the trim, which I wanted to be the feature, so I settled on a solid I had in the cupboard - Kona Marine blue.

I love a hidden detail, especially on a simple dress like this, so there is a party going on inside - I made the lining from a really fun Michael Miller camping holiday themed fat quarter I had bought in the bargain bin at my LQS.


The back is a button and loop closure, and I chose a vintage button that I had in my stash, as well as a pretty red and white trim for the loop.


The pattern was really comprehensive with lots of pictures and instructions. The design lends itself to a variety of fabrics and I think it will be lovely in heavier fabrics for cooler weather, to be worn over a long sleeved tee with tights. I made mine in cotton as warmer weather is just around the corner for us.


I made a size 4 which fits Anna perfectly. I received a test copy of the pattern, and Suz has adjusted the skirt length to make it slightly longer in the finished pattern, however the shorter length suited Anna as she is quite petite.

To celebrate the release of her first pattern, Suz from Sewpony Vintage is offering a 20% discount during the blog tour. Just use the code BLOGTOUR1 at the check out! You can buy your copy here.

This pattern was meant to be made for my girls - by coincidence the dog from the book Suz used as her inspiration is a golden haired dachshund.


Just like ours!


They are best friends.

I would recommend this pattern for all sewing levels. It's a lovely project for a beginner, for anyone who loves vintage style, and a great basic shape to add features if you like to be more creative and hack your patterns.  The ladies who've already taken part in the series have made some incredible versions of  Debbie's Birthday Dress. You should definitely pay them a visit and see their versions!

A couple of my favourites so far are these ones by Monica from Adirondack Inspired and Tasha from I Seam Stressed. You can also check out more in the Debbie's Birthday Dress Flickr group.


Hopefully soon I'll sew up view 2 with a Peter Pan Collar! I've never sewn one before, but I think Lucy would really rock it!

Wednesday, August 7, 2013

My Little Pony Tumble Tee + Pattern Giveaway

Anna is all about dresses. She wears a dress every single day. Actually I lie. Occasionally she'll choose a skirt. I have no say over her wardrobe choices anymore (which makes for some interesting ensembles some days!) but I knew this pattern would be perfect for her. A super comfy knit t-shirt with a pair of leggings - the proof is in the wearing - she only took it off because I insisted it needed washing!

Today I'm part of the Tumble Tee Blog Tour - this pattern was designed by Rachael of Imagine Gnats, and is available for purchase and instant download here.


I've said it before - the selection of knit fabrics in local stores here is terrible and boring really limited. I found this My Little Pony t-shirt on clearance in an adult clothing store and knew that Anna would love it. I bought another clearance tee and put them together for this tumble tee. Here are the t-shirts before I chopped into them.


I bought the largest ones they had on the rack so I could maximise the amount of fabric. I cut the inside seams and removed the sleeves so I could seperate the front and back of the t-shirts, then I cut the front piece from the My Little Pony tee, and the back piece from the purple tee. (The rest of the purple tee was used for the trim on my Prefontaine Shorts.) I cheated by preserving the factory hems to make it an even quicker sew!


I could have cut both pieces from the black pony tee but I didn't for two reasons. First, Rachael designed this pattern as a colour blocked tee. The pattern is meant to have two different panels in the front, however I just created one because I was preserving the pony motif. To stay true to her design I went ahead with colour blocking between the back and front. Secondly, I felt that having an all black tee was a bit too much for Anna - she is a colour loving kid and rarely wears such dark colours.


I love the cap style sleeves - no separate pieces to cut and sew and perfect because Anna's kindergarten doesn't allow the children to wear sleeveless garments (sun smart policy). I'm really conscious about making sure anything I sew for her has sleeves.


This photo shoot would not be complete without...you guessed it. My Little Ponies. It's cool that she likes them so much - they were one of my favourite toys when I was little too.


This kid. So much attitude.

If you are a beginner, new to sewing with knits or are a keen upcycler, this pattern is a must have. I've made a dress version, but the pattern also has a regular t-shirt view, so it can be sewn up for boys and girls.

Rachael is very generously giving a copy of her Tumble Tee pattern to one of my readers - please leave a comment and I'll choose my favourite! Give me your best advice for sewing with knits and your favourite places to buy knit fabrics.


You can check out all the other fabulous versions of the Tumble Tee during the tour - make sure you pop over and visit Susan from Living With Punks who is also sharing her version today!

8.5 Sew Sweetness & The Crafty Kitty
8.6 One Girl Circus & luvinthemommyhood
8.7 Sew Delicious & Living with Punks
8.8 girl like the sea & Suburbia Soup
8.9 Buzzmills & Miss Matatabi

8.12 Alida Makes & Max California
8.13 Crafterhours & Kitschy Coo
8.14 La Inglesita & sew chibi
8.15 EmmylouBeeDoo & LBG Studio
8.16 Petit a Petit and Family & girl. Inspired
Related Posts Plugin for WordPress, Blogger...