
Let's talk about a sewing basic that everyone can master... embroidery! Embroidery is a fabulous way to add a personal touch to a project or start your little ones stitching, and it's perfect for beginners and experienced stitchers alike. (note: click on any of the images in this post for more about the projects shown.)

Fabric: you can use any fabric you have handy... linen stitches up beautifully and using a printed quilting cotton is a great way to add another dimension to your project. you can also use felt or pre-made items for your project, like t-shirts, handkerchiefs, and tea towels.
Floss: using a stranded cotton floss allows for easy control over the thickness of stitched lines. Perle cotton, available in different sizes, adds a great texture to your stitches.


Needle: any sharp hand-sewing needle will do, though needles with large threading eyes will make things much easier.
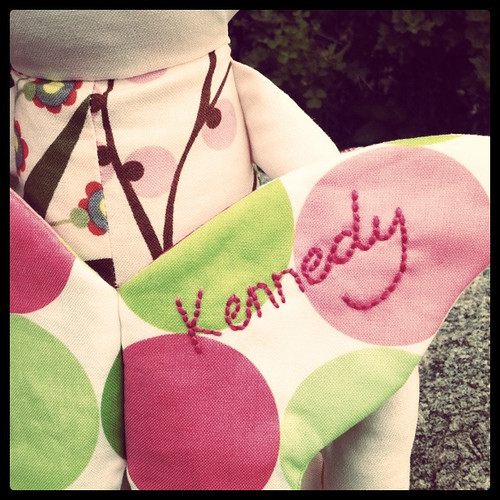
Now, what to embroider? A great place to start is with words. Stitching a name is an easy way to personalize a sewing project, whether a quilt or a stuffed animal, or you could even add an initial on the pocket of a t-shirt.
Find a pattern: the great thing about words is that a pattern is always readily available from your own computer. Simply type your words, choose a font and size, and print.
Transfer pattern: a simple way to transfer your pattern is to tape the printed words to a window in bright sunlight. Place your fabric over the pattern and trace onto fabric using a chalk pencil or water soluble marker. (step-by-step photos of this method from Clover & Violet / alternative transferring method for stitching on felt from little dear tracks)
Start stitching: a basic backstitch is a great place to start, particularly when stitching words. for a fabulous how-to, check out running and back stitches, part of the wild olive embroidery basics series.
Finishing: after your stitching is complete, you'll want to iron your work (using iron on reverse side so as to not flatten your stitches) and remove any pattern transfer markings.
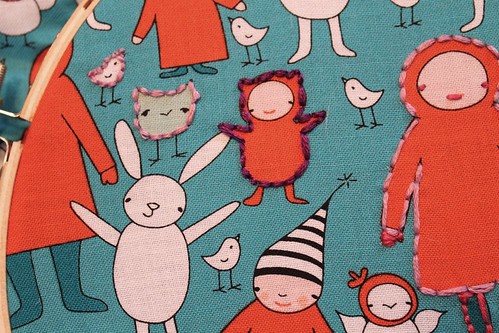
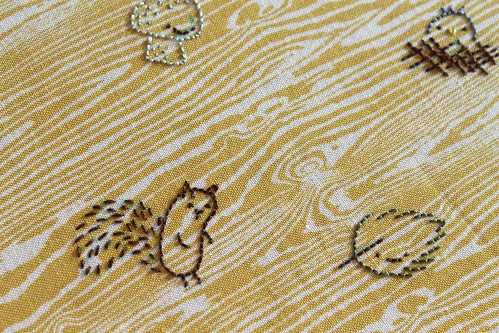
Another fun idea (and a great way to get the little ones involved) is to stitch around the outlines of the print on a favorite fabric. Stitch a lot or a little and then make something out of your embellished fabric. You could make a pillow or a christmas tree ornament, or even use the fabric as a quilt block or in a patchwork skirt.
My links:
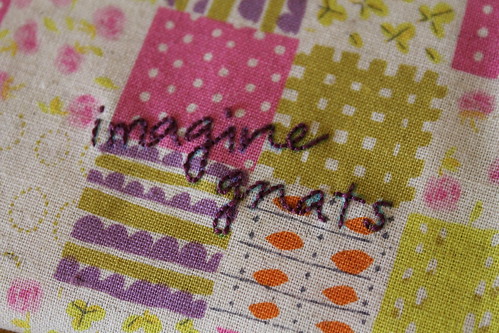
imagine gnats: my favorite embroidery links
embroidery-to-go bag, free pattern from Pellon
how-to: turn drawings into embroidery, imagine gnats for Fiskateers

Thanks for reading, and happy stitching!!
xo, rachael
Thank you so much Rachael! For more about Rachael and her fabulous projects, you can visit her at her blog, facebook, twitter and pinterest! Rachael also deisgns her own embroidery patterns and you can buy her embroidery kits here.
I hope you enjoyed my Back to {Sewing} Basics series, and I'm really looking forward to getting back to sharing some more personal posts, recipes and sewing projects with you! I am currently nominated for the Circle of Moms Top 25 Aussie blogs competition, and I'd love your vote - it will only take a second and you can vote HERE. Thanks for all your support!
Oh I love this, thank you. I thought it was a lot harder than that!
ReplyDeleteHello.. This was a wonderful series.. I gottu know of it from Pam of threading my way and followed up by mail.. Thank you so much :) Voted for you..
ReplyDeleteThank you for this post. You make it look so easy to do! I just followed your blog.
ReplyDeleteThis is fabulous! As a sewing newbie, I really appreciate all the great things you're posting.. Thanks for sharing your skills!
ReplyDeleteBuzzy @ http://frugalfancypants.com
Thanks for the tips! I never thought about ironing on the back side.
ReplyDeleteOh I haven't done any embroidery for a while, but this has got my creative juices flowing!
ReplyDeleteWhat a fabulous post. Both if my kids love embroidery. They've made sweet gifts for friends and family. I now have more ideas on how to make some new gifts that will keep them inspired. Thank you for the post.
ReplyDeleteThis was so timely! I asked on my blog for any beginning embroidery advice so that I could stitch labels for very special quilts, and two days later, you posted this! Thanks!
ReplyDeleteI've done a little embroidery before, but I only know one stitch. You've inspired me to get more creative with it! I'm doing a series on my blog right now called 31 Days of Shut Up and Sew, where I'm attempting a new sewing project every day! I just started sewing earlier this year and I'm trying to teach myself new skills by just doing it. I'm always excited to find a new sewing blog so I can learn from the masters! http://twoohtwoseven.blogspot.com/search/label/Shut%20Up%20and%20Sew
ReplyDeleteThere is one suggestion, If your purpose is to work up a display piece, then of course, much more planning has to go into the sampler before you even start stitching. But if you just want to learn and to have some fun with various embroidery stitches or threads, then you can pretty much just launch right in with a blank piece of fabric and whatever threads you have on hand that will be best strategy..
ReplyDeleteCustom Embroidered Polo Shirts
ReplyDeleteI read this article completely about the resemblance of hottest and previous technologies,
it's awesome article.
Okc screen printing
Embroidery Designing
ReplyDeleteWe have been working for several years in Digitising Embroidery and Embroidery Designing industry and successfully serving some of the top companies for their agile Embroidery Designs needs.
I never knew that it depended on the number of stitches one got. I just assumed that it was so much per image that was placed on the garment. Guess you learn something new each day.
ReplyDelete