'Tis the season... to be travelling! Many of us are going away to spend the holiday season with family and friends in other parts of the country or indeed, the world. Good times! But with holidays comes the organisation - airline tickets, car hire vouchers, passports, travel insurance documents and the list goes on.
My little family are heading away (more details to come in future posts!) and now that there is four of us I wanted to carry all of our passports and documents in one easy to access place. So here it is, for your sewing pleasure...
OK, I know it is a really simple zip pouch tutorial, but there are two important things that make this specific to travel documents - the fabric (of course!) and more seriously, the measurements. I designed this pouch to be able to fit at least 4 passports, several pieces of A4 paper folded into thirds (for booking and travel info that we all just print from our email these days) as well as a pen and a small notepad.
You need -
- Two pieces 28 x 15cm fabric for the exterior of the pouch (11 x 6")
- Two pieces fabric (same size) for the lining
- A 35cm (14") or longer zipper (any excess can be cut off later)
-Sewing machine with zipper foot, coordinating thread
The fabric I used is one I bought from Spotlight eons ago and I haven't seen it since. Here, here, and here are some other cool travel fabrics I found! If you are travelling for a long time (or if you are just accident
prone) you may like to use some oilcloth or laminated cotton for the
exterior fabric to keep your documents waterproof - sometimes a drink
can spill in your bag or you may get caught in a sudden downpour and that way everything stays nice and dry.
I am using some pics from a previous tutorial I have done, so don't be confused by the different fabric - it is the same type of pouch!
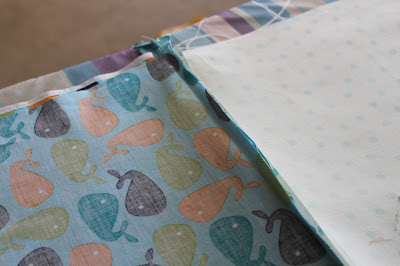
Here we go - sandwich the top edge of your zipper with the lining at the back (polka dots in photo) and the exterior fabric (whales in pic) at the front, and pin with right sides together.
Sew the seam using your zipper foot.
Flip the fabric so it is right sides out and press. It is optional, but it adds a nice finish if you top stitch along your seam.
Repeat process for the other side. Inside your 'fabric sandwich' this time will also be the fabric you have already sewn on.
You should now have this (that pic makes the zip look quite wonky!) :
And if you flip it over it will look like this on the other side:
**IMPORTANT - at this point, unzip your zipper halfway. This is so we can turn it inside out later. If you forget to unzip it, you will have to unpick later, which is a pain!
Flip your fabric so lining is right sides together and exterior is right sides together.
Pin sides, and leave at least a 10cm (4") opening in the lining. I turn my pins to mark it so I don't forget!
Stitch all the way around the outside (except the opening of course!) and reverse over your zip for extra strength. Cut across corners, trim your seams and trim your zipper too if you have a large amount of excess. Once you have done that, reach in and pull the exterior fabric through the opening in your lining.
Fold the raw edges of your opening together.
Stitch close to the edge of your fold to close the opening.
Push your lining into your pouch and you are done! Pack it full of your tickets and passports and you are ready to fly! (or train, bus, boat, drive, helicopter, cycle...)
Happy and safe travelling and have a wonderful trip!
I have some great tutorials up my sleeve for the new year - don't miss them! Follow me or join me on Facebook so you can see what project is next!
I would love it if you shared a picture of your finished product at my Flickr Group!


Great idea, especially with little ones. Keeps everything together.
ReplyDeleteWhat a great tutorial, and I love the fabric! I've just posted about it over at my blog, I hope that's ok :) Travel Craft Alert–Travel document pouch from Sew Delicious
ReplyDeletesomething that many of us could use to help keep it all organized
ReplyDeletecome see me at http://shopannies.blogspot.com
Lovely! I'm a new follower! Your travel doc pouch has caught my eye at several linky parties so I wanted to come see you! Great blog!
ReplyDeleteRandi
http://regal-rhino.blogspot.com
looks pretty easy to accomplish. I like the material - may have to look for something similar when I get back from this trip. Yup...going on a trip WITHOUT one of these, bummer of bummers. My friend got me onto Pinterest, but I have no idea how to get back to whatever I 'pin.' But, if it's OK, I gotta try to 'pin' this. Maybe she'll show me how to get back to stuff. LOL (obviously computer-challenged person here)
ReplyDeleteAwesome,i will try later
ReplyDeleteHey Roslyn,
ReplyDeleteThank you for this inspirational and cute tutorial !
I made one !
I linked to you on the post !
http://craftlee.blogspot.ie/2012/06/were-all-goin-on-summer-holiday.html
Pop by & have a look !
Thank you !
S x x x
This comment has been removed by the author.
ReplyDelete