

First you need two pieces of fabric and a zipper. I used a 15cm (6") metal zipper and two pieces of a pretty home decorator fabric 18cm x 14cm (5.5 x 7"). Home dec fabric is a bit sturdier than regular cotton, but for this project use whatever you like!

Take one piece of fabric and place the zip and fabric right sides together. Make sure your fabric is correctly positioned if the print on your fabric is directional, like mine is. Pin in place if you would like to.


A little tip for sewing around the zipper tab - sometimes you will get close to the zipper tab and your presser foot will collide with it, or at least struggle to sew past it. Place your needle down into the fabric, lift your presser foot, and gently move the zipper tab by zipping or unzipping the zip. Once the tab is out of your way, lower your presser foot and keep going!


Carefully sew the other side. Once you are finished you will end up with this:

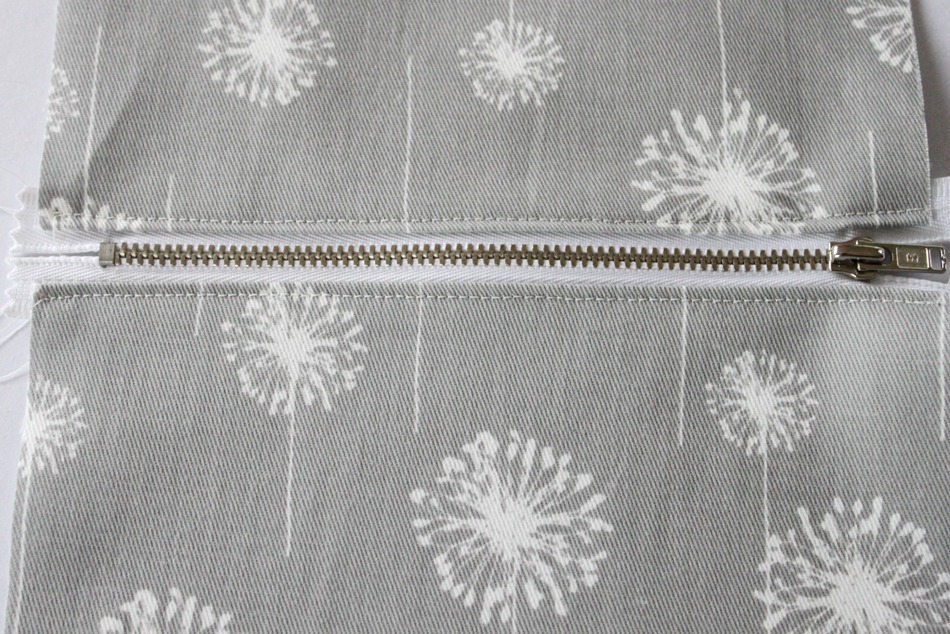
For a nice finish, topstitch along the fabric close to the zipper. This also helps to stop the edges inside the pouch get caught in the zipper.
Firstly, gently press your fabric (and remember - if you are using a plastic or polyester coil zip, don't let the iron touch the coils!) Stitch a neat line a couple of millimetres from the zip/fabric seam. Once you are done, you will have this:
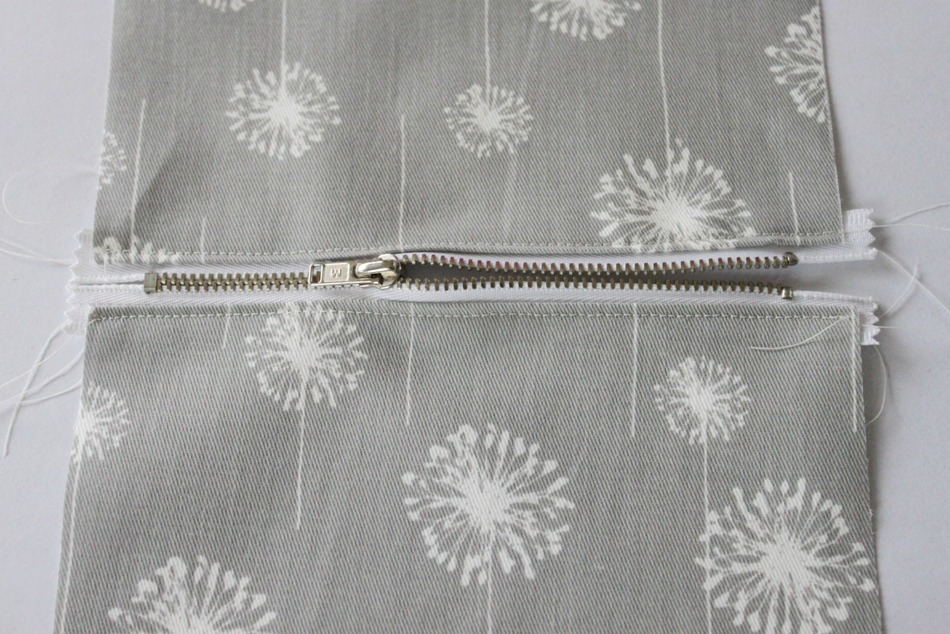
This is really important - open the zip now! You need a hole to be able to turn the pouch right way out once you have completed it, and if you forget to open the zip you will have to unpick stitches! Argh!
Now fold your pouch right sides together. Pin around the edges.
If you are one of my regular readers you may remember a post called The Trouble With Zips, where I took a scientific approach to solving the mystery of neat corners in my zip pouches when I sewed in the zips? This information continues on from that post, and shows you how to position the zip to ensure your corners are neat and not pinched. A few people emailed me asking for some more information, so here it is!

When you fold your zip pouch right sides together to prepare sewing up the sides, the zipper teeth need to face away from the exterior fabric.

You can see in the above picture that the open part of the zip naturally folds that way, with the zip teeth facing out, or away from the exterior fabric. If you are sewing a lining into you pouch, the zipper is concealed by the lining fabric, which makes this a bit trickier, so you just have to ensure that the zip teeth are in the position shown in the photo.
Pin your sides into place and sew around the three edges.

Trim excess fabric and clip across the corners, being careful not to snip through your stitches.

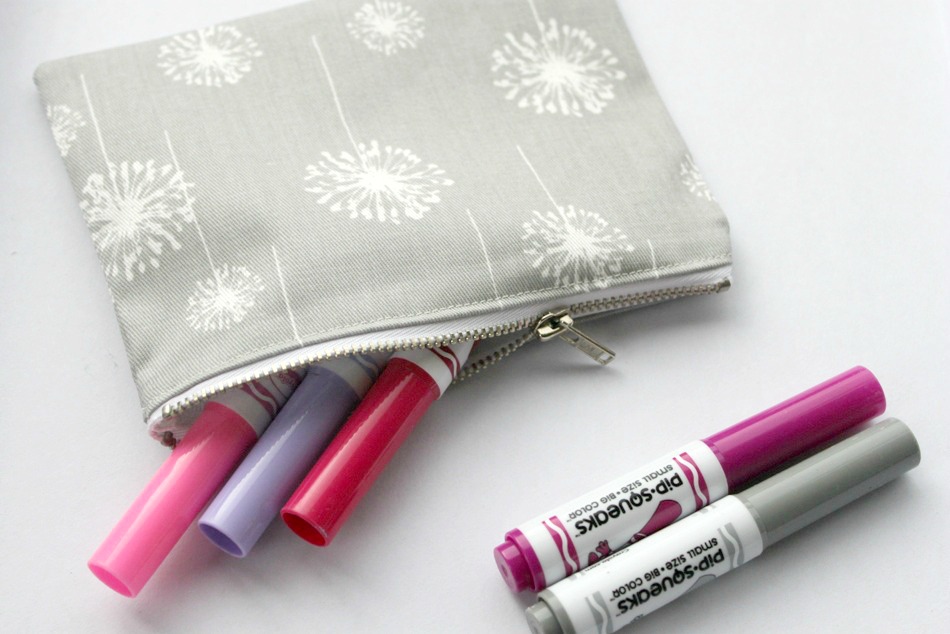
Turn your pouch right sides out and gently push the corners out. You are finished! Hurrah! Now you can use your pouch to store all your bits and pieces!


If you feel confident now, you should give a lined zipper pouch a try! I have a couple of tutorials for lined pouches - the baby gift zipper pouch and the travel document pouch. Check them out!
There are some great books available for beginners to really hone their skills - a couple I recommend include Simple Sewing: 30 Fast and Easy Projects for Beginners
If you make a pouch using this tutorial I'd love you to share! Tweet me, post a picture to my facebook timeline, send me the link to your blog or upload a picture to my Flickr pool! I love seeing what people make from my tutorials, it makes my day!
Great tutorial and a cute little pouch, might make some of these for little Christmas gifts, I have never done a zip before :)
ReplyDeleteSuch a great tutorial! And I love that fabric :) I shall be sure to share this one around ;-)
ReplyDeleteTwo days ago I decided to give up on zips for a while. I have tried several tutorials and different ways of getting the zip to work, and it just doesn't. For some reason I never thought to try it without the lining. I'm *hoping* this will help. I'll try this out tonight and give you an update. Thanks for the tutorial, loving this series!
ReplyDeleteThanks! I had pinched zippers the last time I made some pouches, and did not like that! I will certainly keep this in mind.
ReplyDeleteOh, this is SO helpful, thank you very much! Have been wanting to add zips instead of press studs to things I create for ages now, but they have always intimidated me! Stopping by from FYBF :)
ReplyDeleteYou do the best tutorials! I'm inspired to try and make a zipper pouch now.
ReplyDeleteThanks so much, can't wait to try!
ReplyDeleteChrissy @ Everyday with the Jays
Just wanted to give you an update: It worked! After several attempts at a zip, this did the trick. Thanks again!
ReplyDeleteThis is so cute. Definitely a great beginner project. I really really love that dandelion fabric! I would love it if you would stop by and share at Lines Across. I hope to see you soon,
ReplyDeleteRachel
http://www.linesacross.com/2012/09/the-cure-for-common-monday-55.html
I'd love to know what that fabric is!
ReplyDeleteHi Sarah, it is a home decorator fabric by Premier Prints that I bought on fabric.com last year when they were having a clearance.
DeleteThank you, thank you, thank you...for this wonderful, easy-to-understand tutorial. I had never sewn a zipper before...out of fear, but your instructions were clear and easy and made it impossible for me to mess up. This cute little bag was so easy, I encouraged my 12 year old daughter to make one. She was so excited at the results that we've been making little bags almost every day for a week! I have a feeling I know what everyone on her Christmas list is getting this year! We combined these directions with the instructions for the baby bag, making lined pouches. They're adorable! I even surprised my daughter and made her a cute little bag for her birthday. She loves it! Thank you so much, again, for your wonderful instructions (with pictures.) You gave us the courage to get back to sewing!
ReplyDeleteHi Tracey, thank you so much for your lovely comment, it really made my day! I'm so glad your daughter is loving sewing as well, it's such a great hobby and a great skill too. Thanks again - I'd love to see pictures so feel free to post them on my facebook wall or email them! Ros x
DeleteMuchas gracias...me ha sido de gran ayuda
ReplyDeleteAwesome tutorial, it's the first time my corners are perfect! Thanks a lot.
ReplyDelete
ReplyDeleteNagyon köszönöm a segítséget!! :-)
Thank you Ros for such a great tutorial. I have linked to your blog but you can see my attempts here: http://thecraftypioneer.com/2013/03/06/zippity-doo-da…acing-my-fears/. I will be back for more :)
ReplyDeleteExcellent tutorial. Nice step-by-step instructions and the pictures are invaluable to us visual learners!
ReplyDeleteI do these all the time - I use the same fabric I've made a dress or jacket in and add a handle or strap.... but I line mine.
ReplyDeleteBe good to see a lined version of this for beginners - I do workshops but don't have an online blog.
Lining it doesn't take any longer but gives a lovely finish....
Thanks for your feedback Helly - I deliberately made this tutorial as easy as possible for people sewing zips for the first time. I agree that lining it gives a lovely finish, I have a lined zip pouch tutorial (baby gift zipper pouch) over on my tutorials page. There are lots of lined pouch tutorials around - check out Pinterest for inspiration:)
DeleteI have just linked to this tutorial in my blog - and included a list of other tutorials for those who want to progress once they have started sewing pouches using your great tutorial! Thanks for sharing!
ReplyDeletehttp://alittlebirdmademe.wordpress.com/2013/06/21/a-list-of-30-free-tutorials-and-patterns-for-wallets-and-pouches/
Hey, this works wonderfully!! Thanks for the reminder.
ReplyDeleteThis is awesome!! I love it and have already picked the fabrics to use. Thanks for posting such a clear tutorial!
ReplyDeleteIrene (Hammerle Finley Law Firm)
Thanks. I'm a new sewer and looking forward to trying this. What is the best place to buy zippers?
ReplyDeleteSuch a nice Little bag - i love it! Especially the Cotton - from where did you bought this?
ReplyDeletelove always,
mara {maristicated.blogspot.ch}
Hi Mara, thanks for your lovely comment! The fabric is a Premier Prints home dec fabric from fabric.com.
DeleteOh, nice, thanks so much, dear roslyn!
Deletelots of love,
m. <3
These are totally addictive!!
ReplyDeleteThanks for the tute and the pouch swap xx
I tried this but ended up with one end of the zip sticking out, like not sewn in. I wonder was the zip I chose too short? Or maybe I forgot to do something critical? It was 10cm and fabric was also 10cm. My 2nd ever thing to try on the sewing machine so I am inexperienced.
ReplyDeletePerhaps have a look around at other zipper pouch tutorials, hopefully they might give some different photgraphs to help with sewing the zipper ends :) Good luck!
DeleteYour articles and blogs are inspirational.
ReplyDeleteis bubblegum casting legitimate
Excellent tutorial. thank you so much, mine didn't turn out so neat but i can't believe I actually worked with a zipper. Im sure with practice I will get better. So far I had only made throw pillows so making this was a big accomplishments :) Thank you
ReplyDelete