

I've seen a number of gorgeous quilts with a similar design using half square triangles around, particularly on pinterest. I wanted to give it a try but on a smaller scale, so I made this little zip pouch. I love the geometric look and the use of solids, which I don't use very often but I think I should!
First you need to make the exterior panels. To do this we need to make some half square triangles.
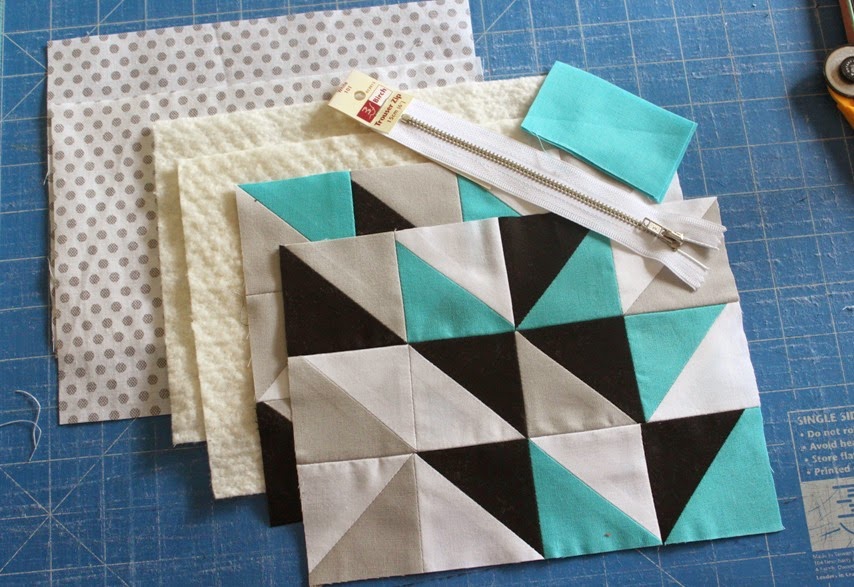
You need 24 x 3" fabric squares - six squares of each colour.

I chose grey, black, white and teal. You could use any colours, but I like the three monochromatic colours with the teal for a pop of brightness.
To start, pair your squares randomly. Take a pair and mark a line on the diagonal, corner to corner. Repeat for all remaining pairs.

Stitch either side of the line with a 1/4" seam allowance. Repeat for all fabric pairs. Chain stitching makes this a very quick process.

Use you rotary cutter to cut down the middle line. Repeat for all fabric pairs.

Press them all open, they will look like the picture below. Trim off the little tails so you have squares.

Use your half square triangles to assemble two panels with three rows of four HSTs. Once you are satisfied with your layout, start stitching together your rows using a 1/4" seam allowance.

Press your seams on each row.

Stitch your rows together using a 1/4"" seam allowance. Press when you are finished, trim if required.

Once your panels are finished and pressed you can put together your pouch.
Use your HST panels to cut two pieces of lining and two pieces of cotton batting the same size. You also need a zipper (I used a 6" metal zipper) and some small scraps of fabric for zipper tabs.
If you don't have batting you can use interfacing, fleece, flannel or something else that will give the pouch some sturdiness.
First take your zipper and tabs. Fold and press the ends of the fabric and stitch carefully onto either end of the zip.

Place your exterior on top of a piece of batting and treat them as one piece. Lay your zipper face down along the top.

Place your lining face down so that right sides are together. Stitch along the top the secure the zipper, lining and exterior.

Open out and repeat for the other side.
Open out and press gently. Top stitch down each side of the zipper to secure the pieces together and avoid the lining getting caught in the zip.

Open the zipper. This is important - you need it open so you can turn it out!
Open out so the exterior panels are right side together and the lining pieces are right side together. Stitch as shown in the picture.

Turn right side out and stitch the gap in the lining shut. Push the lining into the pouch.
You are finished! Admire your lovely zipper pouch!


If you make one I'd love to see it! Share it with me on facebook, instagram or add them to my flickr group. Can't wait to see what colour combinations you choose!
You can check out all my other sewing tutorials here!
If you make any I'd love to see them! Share them with me on Instagram, on my Facebook page or add them to my flickr group. I can't wait to see your fabric combinations!
- See more at: http://www.sewdelicious.com.au/2014/04/scrappy-pot-holders-tutorial.html#.dpuf
- See more at: http://www.sewdelicious.com.au/2014/04/scrappy-pot-holders-tutorial.html#.dpuf
Love this Ros :) might have to give it a try this weekend
ReplyDeleteGorgeous Ros! I will have to pin this for later. I can't wait to make some for gifts :)
ReplyDeleteVery cute pouch! Thanks for the tutorial :)
DeleteThis is so adorable. I'd love this to be on my to-do list.
ReplyDeleteThanks Kate xx
DeleteI love this! Especially that method of sewing the triangles - I would never have thought to do it like that (but I'm not much of a quilter!) Great gift idea :)
ReplyDeleteI agree - great for gifts! Next up I'd like to make another but swap the teal for a hot pink!
DeleteLovely pouch! I've never quilted before so this detailed instructions really help! Thanks!
ReplyDeleteThank you! Definitely a good beginner patchwork project :)
DeleteVery cute Ros :) A good project for someone who has not tried quilting yet, hey?
ReplyDeleteAlso, congrats on being published! I read that post ages ago, but our computer kept on crushing, so I couldn't comment :)
Hello!
ReplyDeleteWe are having a Linky Party here http://bit.ly/1jxIYiI. I found your geometric zippered pouch on craftgawker and think it is so adorable! We are choosing 3 of our favorite projects, and those chosen will get $5 in Blitsy credits to spend on our website. Hopefully we see you at our party! :)
Meghan
Fantastic! My mum is venturing into making hexies, so she'll need a lovely little ouch like this ... thank you for the tutorial :)
ReplyDeleteGreat idea and a fabulous tutorial. Love the colours!!
ReplyDelete-Soma
Love the geometric, design looks great.
ReplyDeleteLove the tutorial and bag! I love making small bags for myself and gifts!
ReplyDelete